
Goal: install a new head unit and maintain the factory backup camera, Bluetooth microphone, steering wheel controls and USB port without cutting apart the factory wiring harness in a 2014 Forte5.
Note: other years/models may have alternate pin layouts in connectors or different instructions for removing/installing the radio, etc. Be sure to look up your exact car’s information.
Background: I finally got tired of the constant Bluetooth problems in my 2014 Forte5 Ex (UVO non-nav head unit). About half the time, the car and phone claim they are connected to each other, but the head unit says there is no media available, and I have to disconnect/reconnect Bluetooth to get it to work. Sometimes the car’s Bluetooth doesn’t even work, and I have to turn the car off completely and restart it to get Bluetooth to appear. Annoying.
I recently purchased a Sony XAV-AX100 for my 300zx twin turbo that I’ve been restoring, but it won’t be road-worthy for a while yet, so I decided to put it in my Forte5. I chose this head unit for its Android Auto capabilities, and I like the physical knob and buttons along the left edge (bottom edge buttons may get in the way of the stick in my Z).
Items you will need:
Disconnect the negative terminal from the car’s battery.
Follow the instructions here to remove the factory radio
2) Set up the Metra wiring harness modules
The Metra 70-7304 wiring harness has two modules that plug right into the two factory wiring harness modules for the head unit. Basically all we need to do is connect all the wires from the aftermarket head unit, steering wheel control module, composite video cable, 3.5mm audio cable and 12V to 6V converter to the wires on the Metra wiring harness modules.
Unfortunately the Metra wiring harness module for Connector B doesn’t have all the pins/wires we need. There are 7 pins missing (6, 7, 10, 18, 19, 22 and 23). This is why you need three sets of these Metra harnesses. Two sets will be donors to extract these 7 pins and wires from. 6 of the missing pins are the small ones, and 1 of these Metra sets only has 5 small pins between the two modules, so one donor will only have 1 pin removed from it. Kind of a waste, but this is much better than cutting apart your factory wiring harness, and it makes the new head unit truly plug-n-play.
Extracting the pins is pretty easy if you have a super tiny flat screwdriver. Look down into the pins of one of the Metra harness modules. You’ll see a small rectangular opening under each pin. You just need to poke the screwdriver into that rectangular opening and wiggle it up/down while gently pulling on the wire from the back, and it’ll pop right out. Putting the pins/wires into the module we’ll use is easy; just slide the pin in from the back until it clicks into place. Make sure you place it in the correct up/down orientation or it won’t lock into place.
Look at the Kia radio connector diagrams and locate the positions for the 7 missing pins. Extract 7 pins from the donor modules and insert them into the good module in the correct locations.
3) Prepare the USB cable
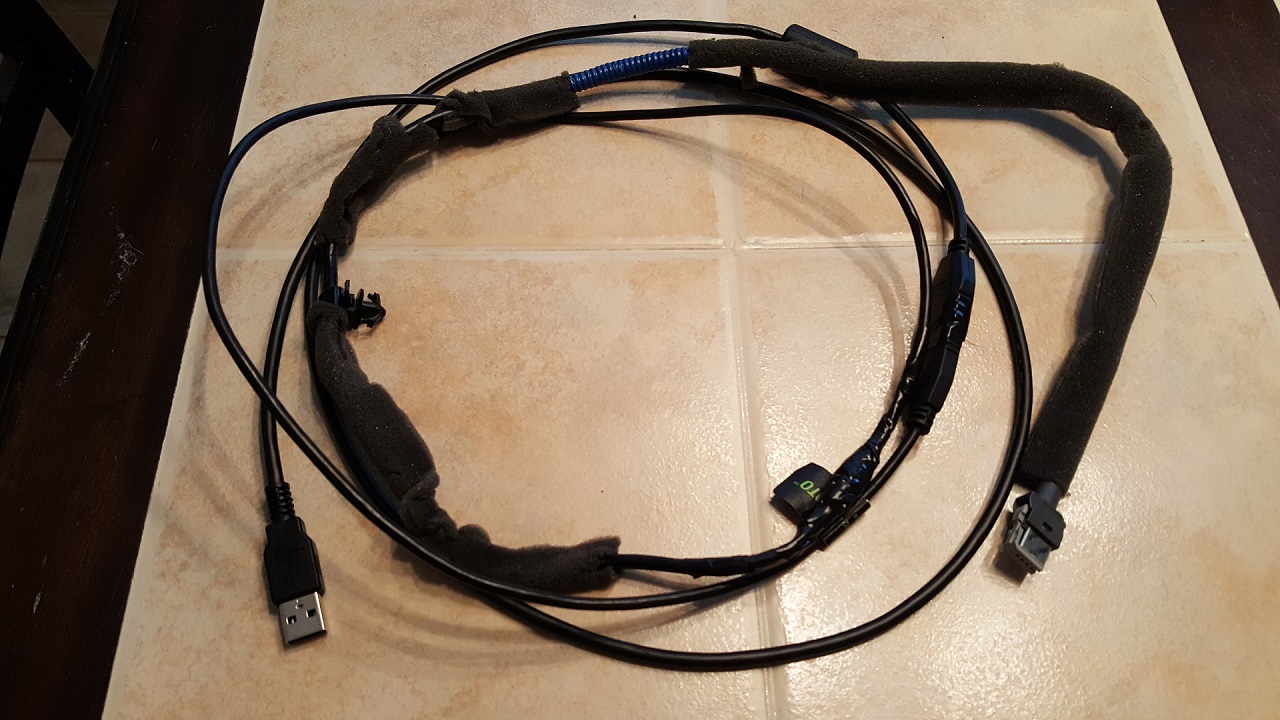
I never used the USB port on my factory radio, so I decided to just use the factory USB cable and cut off the end where it plugs into the factory head unit and then splice in half a standard USB cable that can plug into the aftermarket head unit. I know, I said no cutting of the factory wiring harnesses, but the USB cable is a completely separate standard USB cable with clip-in connectors on each end. I found a Metra kit that looked like it might work to plug into the back of the AUX/USB module in the center console, but after removing my entire center console, I discovered that the AUX and USB connectors are two separate plugs in my car, not the combined plug in the Metra kit. I also removed the entire USB cable from the car since I had everything out at this point, but you should be able to modify the factory USB cable from the dash opening without removing the cable or center console. If you follow the cable down to the right, there is one plastic clip holding it in place. Pull that out to get more slack on the cable.
Cut off the end of the factory USB cable in the dash opening. Take your standard USB cable you had lying around the house and cut off one end of it. You can make it as long or short as you want, but you probably don’t need more than 1 or 2 feet. On both cables, remove a few inches of the outer cable case to expose the 4 wires inside each cable. You’ll see they are color coded to the USB standard.
However, I discovered after trying two different donor USB cables that Kia has the white and green wires reversed, at least compared to the two cables I tried. White and green are for data -/+. I also found conflicting USB wiring diagrams that showed opposite data polarities, and I also found posts about how companies don’t often adhere to any standard at all.
Strip off a bit of each wire from each cable. I connected the wires as follows:
Note: the first donor USB cable I used only sort of worked. I could plug a USB thumb drive into the factory USB port and play music from it, but if I plugged my phone into the port, it would only charge, and the head unit and phone didn’t recognize each other for the Android Auto stuff. I had to remove the first donor cable and splice in a second one (that I fully tested using my phone and laptop first), and that worked fine then. When I plug my phone into the factory USB port, the Android Auto app starts on the phone and head unit.
Note: I did not do any wiring for the factory AUX port in the center console as my head unit does not have an AUX input. If your head unit has an AUX input that you want to use, then you’ll need to look at the Kia wiring diagram to determine which pins are needed for this and then add those pins to the Metra harness module and splice in a donor 3.5mm stereo audio cable to those wires.
![Image]()
![Image]()
4) Prepare the camera’s video cable
Take the yellow composite video cable you had to buy since you don’t have any lying around the house anymore, and cut off one end. Again, this cable doesn’t have to be terribly long. Remove a few inches of the outer casing. There will be two wires inside. The center wire (mine was inside a yellow casing) is the camera video input (pin 6), and the other bare wire is the camera video ground (pin 18). Label the two wires with blue tape for easy reference later.
![Image]()
![Image]()
5) Prepare the Bluetooth microphone cable
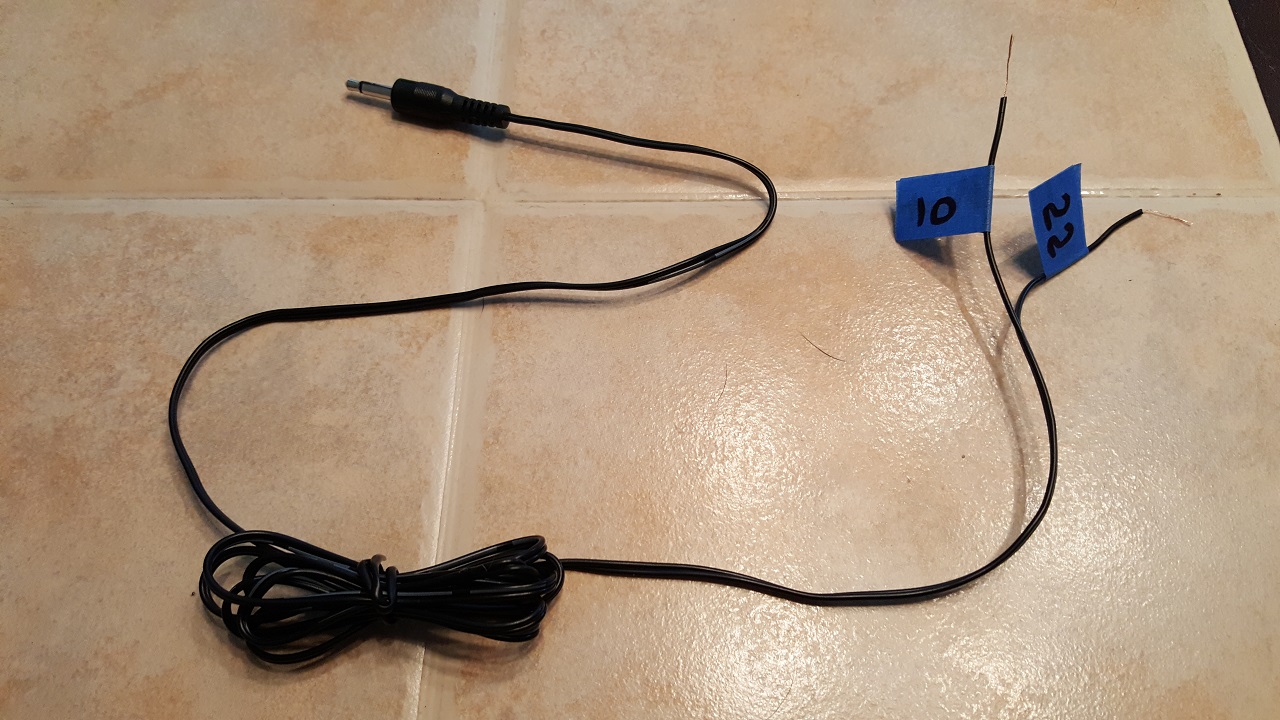
Take the 3.5mm mono audio cable and cut off one end. Remove a few inches of the outer casing. Like the video cable, there are two wires inside. The center wire is +, and the other bare wire is -. The + wire is pin 10, and the - wire is pin 22.
![Image]()
![Image]()
6) Prepare the steering wheel control module
The PAC SWI-RC module I got comes with a rather large set of instructions and diagrams for tons of cars. However, if you go to their site (Steering Wheel Control Interface Wiring – PAC ) and plug in your car’s information, it will give you very specific installation instructions. For our cars, only 4 wires are used. Two black wires are ground, red is +12V accessory and the white wire is the signal wire that goes to pin 4 on the Metra harness. The rest of the wires are not used. Be sure to read the complete instructions on setting the radio select rotary switch and programming it.
If you have a different steering control module just follow the directions for it.
Note: After programming this steering wheel control module, I had every steering wheel function working accept for volume up. I tried multiple times with no success. I then did some searching and eventually ended up at the PAC website where I found a small note about the SWI-RC not being compatible with my Sony XAV-AX100 head unit. Doh! The note said I need to use either the SWI-CP2 or SWI-CP5. I ordered the SWI-CP5 and swapped it out. The SWI-CP5 has a much nicer programming interface. You plug your phone, tablet or PC into it, select your car and stereo, and it programs the module for you. Now I have all the steering wheel controls working. So make sure whichever steering wheel control module you choose is compatible with the head unit you get!
7) Connect all the wires
This is the fun part. Take your time and double check each pair of wires before connecting them. I assume all wires have been stripped and labeled as needed.
Basically, one at a time, connect each wire from the aftermarket head unit, steering wheel control module, 3.5mm microphone cable and camera video cable (more details to follow) to the corresponding wire on the Metra harness modules. I twisted wires together and then soldered them for a solid connection. Wrap each connected wire pair with shrink tube or electrical tape.
There are a few places where you will connect more than 2 wires together. For example, the red +12V accessory wires from the aftermarket head unit and steering wheel control both connect to the corresponding wire in the Metra harness (pin 11). And there will be a number of ground wires you will want to connect all together so everything shares a common ground.
![Image]()
![Image]()
8) Backup camera connection details
The backup camera in our cars needs a 6V source, so we need to use a 12V to 6V converter.
The black wire on the converter is ground and should be connected to all the other ground wires.
The blue/white wire on the converter needs to be connected to the 12V reverse signal wire (pin 19 in the Metra harness). My new head unit also needs a signal from pin 19 to know when to display the camera when the car is in reverse, so I had both wires connected going to the pin 19 wire in the harness.
The blue/red wire on the converter goes to pin 7 (camera battery +). This is what supplies the camera with 6V.
Pin 23 from the Metra harness is the ground for the camera, so it needs to be connected to all the other ground wires.
The yellow composite video wires connect to pins 6 (camera video input) and 18 (camera video ground).
Note: with the camera wired like this, it will only get power when you are in reverse. I discovered my head unit has a Camera button on the home screen that will show the backup camera at any time, plus the head unit has a set of configurable red/yellow/blue lines that will also show the camera input when you make adjustments. So I rewired my camera to always have power. I removed the blue/white wire on the converter from the pin 19 connection and then soldered it into the other wires going to pin 11 which is the +12V accessory line. Now I have camera power all the time and can display it anytime on the head unit.
9) Bluetooth microphone connection details
This is easy. Just connect the two leads from the microphone cable to pins 10 (Mic +) and 22 (Mic -).
Note: Tapping into the factory microphone is easy, but in my case, the factory mic’s impedance was too high for my head unit, and my test caller reported my voice was very faint. I tested the new mic plugged directly into the head unit as well, and my caller said my voice sounded good and clear with it. I measured the impedance of the factory mic through my new wiring at 7000 ohms, and the impedance of the mic that came with the head unit was only 5850 ohms. So before you go this route, measure the impedance of the mic that comes with your head unit and see if it’s close to the impedance of the factory mic. If it’s close, it may work well, otherwise you may be stuck using the mic that comes with the head unit. I also attempted to splice the aftermarket mic into the factory wiring in the headliner, but the impedance measured at the 3.5mm connector that plugs into the head unit was still too high and resulted in a faint volume, too. It’s also possible my wiring/soldering was the cause of the increased impedance and low voice volume. I may do more debugging when it’s not 100 degrees here in Texas. I ended up ordering a new low impedance mic to use for now. I mounted it right on the steering column pointing up at me. I may eventually route that into the factory location in the headliner for a clean install if I can’t solve the issue using the factory mic wires.
10) Install wires in the dash
Steps 2 through 9 (except possibly 3) can all be done inside your home in comfort. At this point you will have 2 fully configured Metra harness modules with a bunch of wires connected to them, along with the steering control module, 12V to 6V converter, video cable and mic cable. Feel free to make it look as pretty as you want with zip ties.
![Image]()
![Image]()
Take all this stuff outside to the car. Plug in the two Metra harness modules into the factory connectors. Take it easy when you plug the modules together to make sure all the tiny pins are going into their respective holes, or you could bend or push out a pin. You will now have the aftermarket head unit connector, steering wheel module, video cable, mic cable, USB cable and factory antenna cable available for easy access to plug into the head unit.
My new head unit also has a long wire that needs to be connected to the parking brake switch. I had to remove the center console to gain access to the wire that goes to the switch.
11) Partially install the new head unit
Follow the instructions in your head unit to get it fully connected (main connector, USB cable, microphone, camera, steering wheel remote cable, antenna, etc).
Don’t fully install the head unit yet. You will first need to program the steering wheel control module, so leave that sticking out of the dash.
12) Program steering wheel controls
Reconnect the negative battery terminal.
Follow the instructions for programming your steering wheel control module. Place the module behind the head unit when done.
13) Test everything
Turn on the head unit and test everything to make sure you have everything connected right. Test the backup camera, USB port in the center console, make a phone call and test the microphone, test FM radio, test all the steering wheel controls, make sure the 4 speakers are wired correctly, etc.
14) Finish up
Now that you have verified everything is working correctly, complete the head unit installation by securing it in place with screws, install the new dash kit and replace the trim piece below the dash.
15) Final notes
This may look pretty daunting, but none of this is difficult. Just break it down step by step, make sure you understand the pin layouts in the two wiring harness modules and take your time.
Enjoy your new head unit!
Home screen:
![Image]()
![Image]()
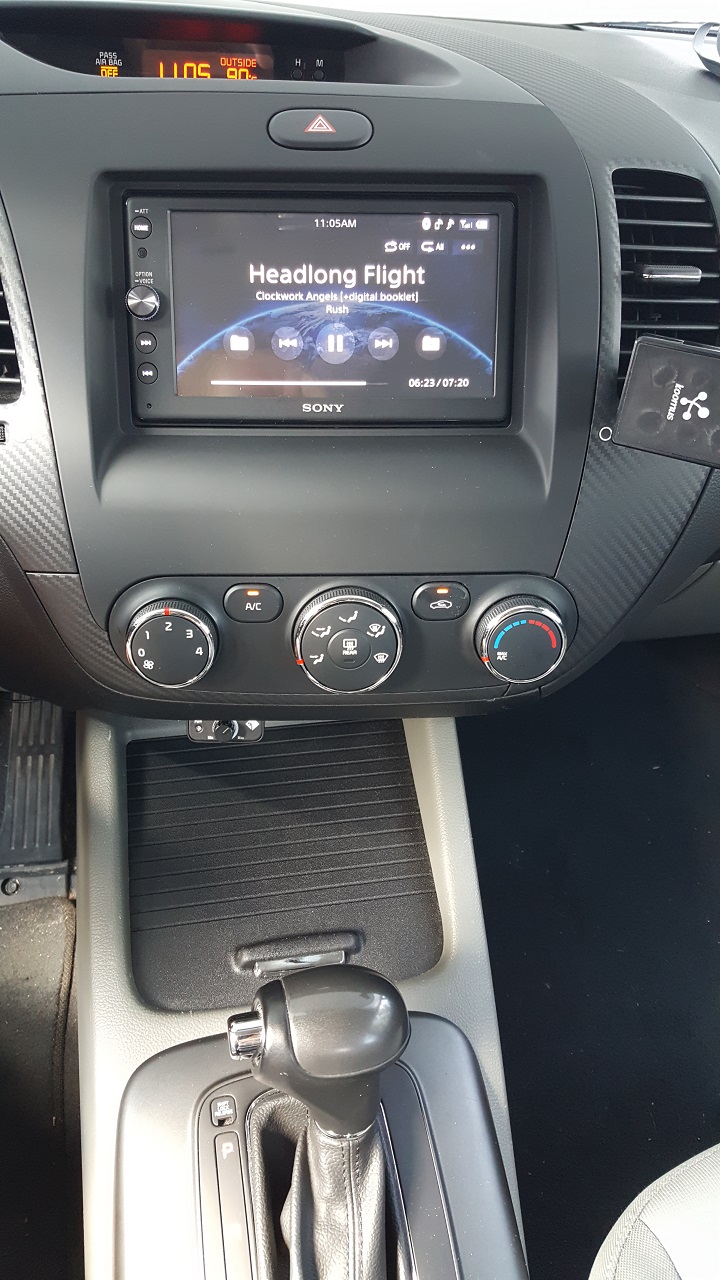
Bluetooth streaming music:
![Image]()
![Image]()
Factory backup camera in reverse:
![Image]()
![Image]()
Android Auto Google maps:
![Image]()
![Image]()
Android Auto Google music:
![Image]()
![Image]()
Note: other years/models may have alternate pin layouts in connectors or different instructions for removing/installing the radio, etc. Be sure to look up your exact car’s information.
Background: I finally got tired of the constant Bluetooth problems in my 2014 Forte5 Ex (UVO non-nav head unit). About half the time, the car and phone claim they are connected to each other, but the head unit says there is no media available, and I have to disconnect/reconnect Bluetooth to get it to work. Sometimes the car’s Bluetooth doesn’t even work, and I have to turn the car off completely and restart it to get Bluetooth to appear. Annoying.
I recently purchased a Sony XAV-AX100 for my 300zx twin turbo that I’ve been restoring, but it won’t be road-worthy for a while yet, so I decided to put it in my Forte5. I chose this head unit for its Android Auto capabilities, and I like the physical knob and buttons along the left edge (bottom edge buttons may get in the way of the stick in my Z).
Items you will need:
- New double DIN head unit with camera, microphone, remote (for steering wheel controls) and USB inputs
- Metra 95-7356B Double DIN Installation Dash Kit
- 3 Metra 70-7304 Wiring Harnesses (yes 3 of them!)
- Axxess AX-CAM6V 12 Volt DC to 6 Volt DC Step-Down
- A steering wheel control module (any that will work for our cars and your head unit)
- 3.5mm mono audio cable (for microphone)
- Composite video cable (the yellow RCA one)
- A donor standard USB cable
- Soldering iron
- Super tiny flat screwdriver
- Wire strippers
- Electrical tape or shrink tube
- Blue tape and marker for labeling wires
- Philips screwdriver
- Plastic panel removal tools (not required, but makes removing the dash pieces easier)
- Kia Forte factory wiring harness diagrams and pin assignments (print these out)
Disconnect the negative terminal from the car’s battery.
Follow the instructions here to remove the factory radio
2) Set up the Metra wiring harness modules
The Metra 70-7304 wiring harness has two modules that plug right into the two factory wiring harness modules for the head unit. Basically all we need to do is connect all the wires from the aftermarket head unit, steering wheel control module, composite video cable, 3.5mm audio cable and 12V to 6V converter to the wires on the Metra wiring harness modules.
Unfortunately the Metra wiring harness module for Connector B doesn’t have all the pins/wires we need. There are 7 pins missing (6, 7, 10, 18, 19, 22 and 23). This is why you need three sets of these Metra harnesses. Two sets will be donors to extract these 7 pins and wires from. 6 of the missing pins are the small ones, and 1 of these Metra sets only has 5 small pins between the two modules, so one donor will only have 1 pin removed from it. Kind of a waste, but this is much better than cutting apart your factory wiring harness, and it makes the new head unit truly plug-n-play.
Extracting the pins is pretty easy if you have a super tiny flat screwdriver. Look down into the pins of one of the Metra harness modules. You’ll see a small rectangular opening under each pin. You just need to poke the screwdriver into that rectangular opening and wiggle it up/down while gently pulling on the wire from the back, and it’ll pop right out. Putting the pins/wires into the module we’ll use is easy; just slide the pin in from the back until it clicks into place. Make sure you place it in the correct up/down orientation or it won’t lock into place.
Look at the Kia radio connector diagrams and locate the positions for the 7 missing pins. Extract 7 pins from the donor modules and insert them into the good module in the correct locations.
3) Prepare the USB cable
I never used the USB port on my factory radio, so I decided to just use the factory USB cable and cut off the end where it plugs into the factory head unit and then splice in half a standard USB cable that can plug into the aftermarket head unit. I know, I said no cutting of the factory wiring harnesses, but the USB cable is a completely separate standard USB cable with clip-in connectors on each end. I found a Metra kit that looked like it might work to plug into the back of the AUX/USB module in the center console, but after removing my entire center console, I discovered that the AUX and USB connectors are two separate plugs in my car, not the combined plug in the Metra kit. I also removed the entire USB cable from the car since I had everything out at this point, but you should be able to modify the factory USB cable from the dash opening without removing the cable or center console. If you follow the cable down to the right, there is one plastic clip holding it in place. Pull that out to get more slack on the cable.
Cut off the end of the factory USB cable in the dash opening. Take your standard USB cable you had lying around the house and cut off one end of it. You can make it as long or short as you want, but you probably don’t need more than 1 or 2 feet. On both cables, remove a few inches of the outer cable case to expose the 4 wires inside each cable. You’ll see they are color coded to the USB standard.
However, I discovered after trying two different donor USB cables that Kia has the white and green wires reversed, at least compared to the two cables I tried. White and green are for data -/+. I also found conflicting USB wiring diagrams that showed opposite data polarities, and I also found posts about how companies don’t often adhere to any standard at all.
Strip off a bit of each wire from each cable. I connected the wires as follows:
- red (power) to red (power)
- black (ground) to black (ground)
- white (data) to green (data)
- green (data) to white (data)
Note: the first donor USB cable I used only sort of worked. I could plug a USB thumb drive into the factory USB port and play music from it, but if I plugged my phone into the port, it would only charge, and the head unit and phone didn’t recognize each other for the Android Auto stuff. I had to remove the first donor cable and splice in a second one (that I fully tested using my phone and laptop first), and that worked fine then. When I plug my phone into the factory USB port, the Android Auto app starts on the phone and head unit.
Note: I did not do any wiring for the factory AUX port in the center console as my head unit does not have an AUX input. If your head unit has an AUX input that you want to use, then you’ll need to look at the Kia wiring diagram to determine which pins are needed for this and then add those pins to the Metra harness module and splice in a donor 3.5mm stereo audio cable to those wires.

4) Prepare the camera’s video cable
Take the yellow composite video cable you had to buy since you don’t have any lying around the house anymore, and cut off one end. Again, this cable doesn’t have to be terribly long. Remove a few inches of the outer casing. There will be two wires inside. The center wire (mine was inside a yellow casing) is the camera video input (pin 6), and the other bare wire is the camera video ground (pin 18). Label the two wires with blue tape for easy reference later.


5) Prepare the Bluetooth microphone cable
Take the 3.5mm mono audio cable and cut off one end. Remove a few inches of the outer casing. Like the video cable, there are two wires inside. The center wire is +, and the other bare wire is -. The + wire is pin 10, and the - wire is pin 22.

6) Prepare the steering wheel control module
The PAC SWI-RC module I got comes with a rather large set of instructions and diagrams for tons of cars. However, if you go to their site (Steering Wheel Control Interface Wiring – PAC ) and plug in your car’s information, it will give you very specific installation instructions. For our cars, only 4 wires are used. Two black wires are ground, red is +12V accessory and the white wire is the signal wire that goes to pin 4 on the Metra harness. The rest of the wires are not used. Be sure to read the complete instructions on setting the radio select rotary switch and programming it.
If you have a different steering control module just follow the directions for it.
Note: After programming this steering wheel control module, I had every steering wheel function working accept for volume up. I tried multiple times with no success. I then did some searching and eventually ended up at the PAC website where I found a small note about the SWI-RC not being compatible with my Sony XAV-AX100 head unit. Doh! The note said I need to use either the SWI-CP2 or SWI-CP5. I ordered the SWI-CP5 and swapped it out. The SWI-CP5 has a much nicer programming interface. You plug your phone, tablet or PC into it, select your car and stereo, and it programs the module for you. Now I have all the steering wheel controls working. So make sure whichever steering wheel control module you choose is compatible with the head unit you get!
7) Connect all the wires
This is the fun part. Take your time and double check each pair of wires before connecting them. I assume all wires have been stripped and labeled as needed.
Basically, one at a time, connect each wire from the aftermarket head unit, steering wheel control module, 3.5mm microphone cable and camera video cable (more details to follow) to the corresponding wire on the Metra harness modules. I twisted wires together and then soldered them for a solid connection. Wrap each connected wire pair with shrink tube or electrical tape.
There are a few places where you will connect more than 2 wires together. For example, the red +12V accessory wires from the aftermarket head unit and steering wheel control both connect to the corresponding wire in the Metra harness (pin 11). And there will be a number of ground wires you will want to connect all together so everything shares a common ground.


8) Backup camera connection details
The backup camera in our cars needs a 6V source, so we need to use a 12V to 6V converter.
The black wire on the converter is ground and should be connected to all the other ground wires.
The blue/white wire on the converter needs to be connected to the 12V reverse signal wire (pin 19 in the Metra harness). My new head unit also needs a signal from pin 19 to know when to display the camera when the car is in reverse, so I had both wires connected going to the pin 19 wire in the harness.
The blue/red wire on the converter goes to pin 7 (camera battery +). This is what supplies the camera with 6V.
Pin 23 from the Metra harness is the ground for the camera, so it needs to be connected to all the other ground wires.
The yellow composite video wires connect to pins 6 (camera video input) and 18 (camera video ground).
Note: with the camera wired like this, it will only get power when you are in reverse. I discovered my head unit has a Camera button on the home screen that will show the backup camera at any time, plus the head unit has a set of configurable red/yellow/blue lines that will also show the camera input when you make adjustments. So I rewired my camera to always have power. I removed the blue/white wire on the converter from the pin 19 connection and then soldered it into the other wires going to pin 11 which is the +12V accessory line. Now I have camera power all the time and can display it anytime on the head unit.
9) Bluetooth microphone connection details
This is easy. Just connect the two leads from the microphone cable to pins 10 (Mic +) and 22 (Mic -).
Note: Tapping into the factory microphone is easy, but in my case, the factory mic’s impedance was too high for my head unit, and my test caller reported my voice was very faint. I tested the new mic plugged directly into the head unit as well, and my caller said my voice sounded good and clear with it. I measured the impedance of the factory mic through my new wiring at 7000 ohms, and the impedance of the mic that came with the head unit was only 5850 ohms. So before you go this route, measure the impedance of the mic that comes with your head unit and see if it’s close to the impedance of the factory mic. If it’s close, it may work well, otherwise you may be stuck using the mic that comes with the head unit. I also attempted to splice the aftermarket mic into the factory wiring in the headliner, but the impedance measured at the 3.5mm connector that plugs into the head unit was still too high and resulted in a faint volume, too. It’s also possible my wiring/soldering was the cause of the increased impedance and low voice volume. I may do more debugging when it’s not 100 degrees here in Texas. I ended up ordering a new low impedance mic to use for now. I mounted it right on the steering column pointing up at me. I may eventually route that into the factory location in the headliner for a clean install if I can’t solve the issue using the factory mic wires.
10) Install wires in the dash
Steps 2 through 9 (except possibly 3) can all be done inside your home in comfort. At this point you will have 2 fully configured Metra harness modules with a bunch of wires connected to them, along with the steering control module, 12V to 6V converter, video cable and mic cable. Feel free to make it look as pretty as you want with zip ties.


Take all this stuff outside to the car. Plug in the two Metra harness modules into the factory connectors. Take it easy when you plug the modules together to make sure all the tiny pins are going into their respective holes, or you could bend or push out a pin. You will now have the aftermarket head unit connector, steering wheel module, video cable, mic cable, USB cable and factory antenna cable available for easy access to plug into the head unit.
My new head unit also has a long wire that needs to be connected to the parking brake switch. I had to remove the center console to gain access to the wire that goes to the switch.
11) Partially install the new head unit
Follow the instructions in your head unit to get it fully connected (main connector, USB cable, microphone, camera, steering wheel remote cable, antenna, etc).
Don’t fully install the head unit yet. You will first need to program the steering wheel control module, so leave that sticking out of the dash.
12) Program steering wheel controls
Reconnect the negative battery terminal.
Follow the instructions for programming your steering wheel control module. Place the module behind the head unit when done.
13) Test everything
Turn on the head unit and test everything to make sure you have everything connected right. Test the backup camera, USB port in the center console, make a phone call and test the microphone, test FM radio, test all the steering wheel controls, make sure the 4 speakers are wired correctly, etc.
14) Finish up
Now that you have verified everything is working correctly, complete the head unit installation by securing it in place with screws, install the new dash kit and replace the trim piece below the dash.
15) Final notes
This may look pretty daunting, but none of this is difficult. Just break it down step by step, make sure you understand the pin layouts in the two wiring harness modules and take your time.
Enjoy your new head unit!
Home screen:


Bluetooth streaming music:


Factory backup camera in reverse:


Android Auto Google maps:


Android Auto Google music:


")