

Here is my step by step removal of the OEM stereo.
**PLEASE BE SURE TO DISCONNECT BATTERY GROUND CABLE BEFORE AND DURING ANY CAR MODIFICATION WHETHER WORKING WITH ELECTRICAL EQUIPMENT OR NOT!**
**I AM NOT RESPONSIBLE FOR ANY DAMAGE OR HARM DONE TO YOUR CAR**
1 - Remove Trim Just Under Climate Controls
NOTE: The plastic and Kevlar Fiber remove together since they are secured by screws
![]()
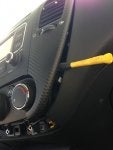
2 - Remove Far Left Screw From Behind Trim
![]()
3 - CAREFULLY Remove ONLY the Bottom Portion (2 clips) from the dash to prepare the removal of the climate cluster and remove the black plastic bezel from around the stereo.
DO NOT ACTUALLY REMOVE THE CLIMATE CLUSTER YET (SEE NOTE ON BOTTOM)
![]()
![]()
4 - Once Bezel is Removed, Remove 4 Screws from around each corner around the head unit holding it in
![]()
![]()
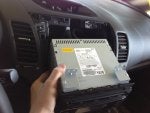
5 - Pull Out Stereo and Remove Any Connectors / Harnesses As Necessary
![]()
6 - Repeat Steps In Reverse Order To Reinstall")
NOTE: Do NOT try to remove the climate cluster until the head unit is removed as there are 2 screws securing it in place behind the head unit only accessable once the head unit is removed as well as the remaining 2 bottom screws securing the climate control cluster in place. There is also a hook molded into the climate cluster on the left side which makes it somewhat difficult to remove.
![]()
**PLEASE BE SURE TO DISCONNECT BATTERY GROUND CABLE BEFORE AND DURING ANY CAR MODIFICATION WHETHER WORKING WITH ELECTRICAL EQUIPMENT OR NOT!**
**I AM NOT RESPONSIBLE FOR ANY DAMAGE OR HARM DONE TO YOUR CAR**
1 - Remove Trim Just Under Climate Controls
NOTE: The plastic and Kevlar Fiber remove together since they are secured by screws

2 - Remove Far Left Screw From Behind Trim

3 - CAREFULLY Remove ONLY the Bottom Portion (2 clips) from the dash to prepare the removal of the climate cluster and remove the black plastic bezel from around the stereo.
DO NOT ACTUALLY REMOVE THE CLIMATE CLUSTER YET (SEE NOTE ON BOTTOM)

4 - Once Bezel is Removed, Remove 4 Screws from around each corner around the head unit holding it in


5 - Pull Out Stereo and Remove Any Connectors / Harnesses As Necessary
6 - Repeat Steps In Reverse Order To Reinstall
NOTE: Do NOT try to remove the climate cluster until the head unit is removed as there are 2 screws securing it in place behind the head unit only accessable once the head unit is removed as well as the remaining 2 bottom screws securing the climate control cluster in place. There is also a hook molded into the climate cluster on the left side which makes it somewhat difficult to remove.


