Kia Forte Forum banner

TPS adjustment procedure (throttle mod.)

95K views 146 replies 57 participants last post by  Acura_Kal  
#1 · (Edited)
*note: This post covers the accelerator position sensor (APS) not the throttle position sensor (TPS).

Here's a brief tutorial on my method of adjusting the APS (accelerator position sensor) on a Kia Forte.

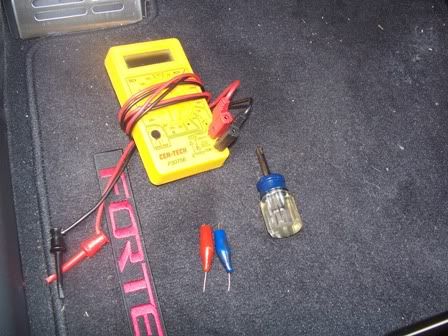
Step 1: Gather your tools

A. Multimeter (set to DC voltage- 20 scale)
B. A pin or needle (mine have alligator clips attached to them)
C. A small phillips screwdriver

Image


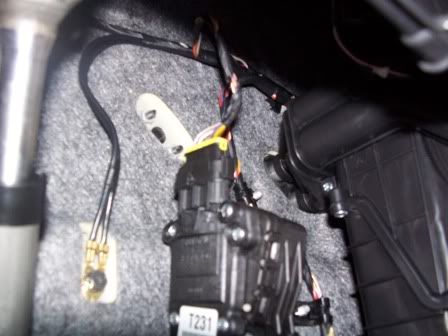
Step 2: With the engine off, locate and remove the connector from the top of the APS sensor (attached to the left side of the throttle pedal)

Image


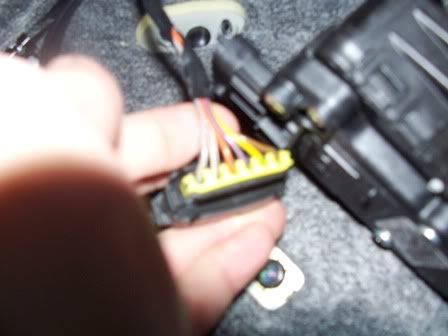
Step 3: Insert pin or needle into the third wire from the left (orange). When inserting, make sure that you stick the needle where the wire comes into the connector (the side with the yellow retainer)- not the side that plugs into the APS sensor. This is called back-probing.

Image


Image


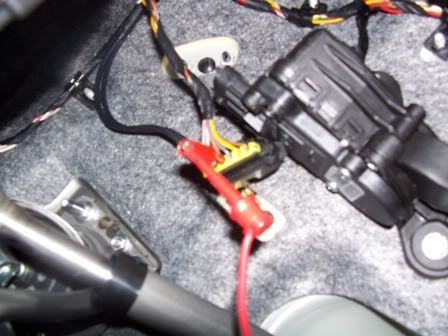
Step 4: Plug the connector back into the APS and connect the multimeter (positive to needle on APS plug and negative to a good ground).

Image


Step 5: Start the engine. Your multimeter should read ~ 0.78 volts (that's what mine was). If your multimeter is reading 0 volts, check your connections- you may not have a good connection with the wire inside the connector.

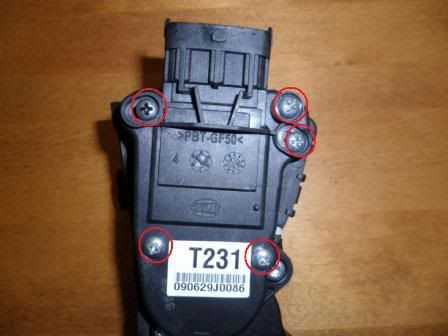
Step 6: Loosen the 5 screws circled in red, but don't remove the sensor ( I borrowed this pic from the original tutorial).

Image


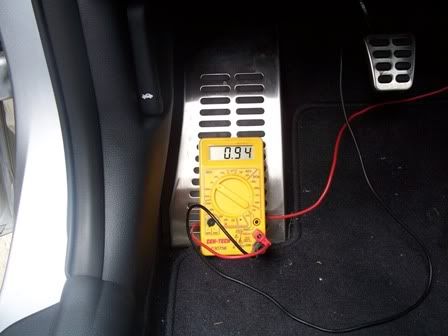
Step 7: While watching the multimeter, rotate the APS until you read close to, but no more than 1.0 volts. Mine started out at 0.98 volts, but decreased to 0.94 volts as I re-tightened the screws (I feel that 0.95 volts is ideal, but 0.94 volts is close enough for me). It may also take some wiggling/ more loosening of the screws to get the voltage to change.

Image


Step 8: Re-tighten the 5 APS screws, holding the sensor in its new position as you tighten (voltage will drop some).

Step 9: Remove the needle from the connector.

Step 10: Put your tools away! It's time to enjoy your work! :)
 
#114 ·
Fixed it. haha read up a little more which refreshed my memory that i could just disconnect the battery. duh. haha
 
#115 · (Edited)
I did the mod. Got the voltage to 0.98. Appears to have much better take offs by reducing the dead spot which causes the stalling.

After driving for a while, I need to relearn my take off. I did the mod after 42000 miles of driving at 0.78volts. The dead spot is gone.

Has anyone figured out how to increase the idle speed? That would certainly help. I think the Forte idles at less than 700 rpm.
 
#116 ·
is this essentially the same thing as the other tutorial? just a more precise way to get the proper rotation? i did it the other way by just guessing it and my RPMs are normal and the dead spot is gone. so i think i did a good job.
 
#119 · (Edited)
Just did this to my 2011 SX hatchback. The job took about 20 minutes. I completely removed the pedal from the firewall to do this job. One to be able to back probe the harness easier and, two, to make the adjustments on the pedal easier. Some things I found out that might not be clear in this thread:
1. The top right screw should be completely removed while the other 4 just need to be loosened very slightly.
2. You do not have to start the engine, just turn the car ON but not start.
3. I found it easier to remove the pedal, make the adjustment then reconnect the wiring harness to test. I did that 3 times. Once I got the number I wanted I reinstalled the pedal.

As stated in the thread, don't adjust over 1.00 or you will raise your idle. A reading of 0.95 is about the prefect reading. The factory setting of mine gave a reading of 0.79 That was way off and explains the tip-in dead spot. My first adjustment got me to 0.91 I tried for better and it slipped back to 0.83 The last try put it at 0.93

Great mod I highly recommend.
 
#120 ·
Very interesting. I would like to try this mod, but I have a 2016 Forte. The Accelerator Position Switch is still mounted on the firewall like your 2011, but the actual accelerator pedal is floor mounted. Do you know if this mod would still work?
I'm still under warranty; should I be safe attempting this mod, or attempt it when the warranty expires?:unsure:🤔
 
#123 ·
Since this thread has been resurrected in 2021 Here's the answer for 3rd Gen Forte OWNERS:

NO! This adjustment is not available on 2019-Up Fortes. 2019-Up Fortes do not have an adjustable throttle like the 2010-2013 Fortes.
 
#128 ·
I wonder if it's adjustable digitally, like with a GDS or diag tablet.

Well I'll provide news on the 2nd gen soon. I'm not hopeful it's adjustable but we'll see.
Don't know about this.

Another option for 2nd Gen owners is to install the "Sport Pedal" if they don't have it already.

It is not just a pedal cover but a complete throttle assy.
 
#125 ·
OK so here's the deal with the 2nd Gen (2014-2018) that I can come up with so far. This is on a Kia Forte 2018 Sedan.
Image


Everything appears to be there. APS appears to be where it should be. Connector/wires appear available to probe. And I can stick my hand back there and feel the screws.
But it appears on the second gen here, the screws to adjust are in a terrible place, they are facing away from you (towards the center console, away from the open driver door). Really crappy spot
to adjust screws. Can't see doing this without removing the pedal, which is easy to do so I have no problem doing that.

But here's where I am lacking clarity, maybe I am just thick but I need someone to explain this to me. I know someone had asked a few pages back but I still don't get what is being said.

What exactly are we rotating here to adjust and change the voltage on the multimeter?

This is the only part of all of this I don't understand. Are we engaging the pedal (pressing the pedal) thus making the APS sensor rotate? Is that what we are talking about here?

Or are we rotating something else?

That I am totally not clear about. I have no idea what it is we are supposed to be rotating. I assumed the pedal itself was being pressed (that makes sense), but as I kept reading page by page I'm becoming less convinced that that is what we are talking about.

If someone can explain this simple point, everything is Kosher for the 2nd gen adjustment here and I will report back the results. I plan on taking the pedal out, backprobing it, hooking it up, making the adjustment, and then bolting it back in. Seems doable. Can make a decent writeup of it and will post here. Just don't know exactly what we are supposed to be doing here.

Thanks in advance from anyone with a 1st gen who can elaborate. I see there was a youtube video but it has since been taken down.
 
#126 ·
OK so here's the deal with the 2nd Gen (2014-2018) that I can come up with so far. This is on a Kia Forte 2018 Sedan. View attachment 84352
Everything appears to be there. APS appears to be where it should be. Connector/wires appear available to probe. And I can stick my hand back there and feel the screws.
But it appears on the second gen here, the screws to adjust are in a terrible place, they are facing away from you (towards the center console, away from the open driver door). Really crappy spot
to adjust screws. Can't see doing this without removing the pedal, which is easy to do so I have no problem doing that.

But here's where I am lacking clarity, maybe I am just thick but I need someone to explain this to me. I know someone had asked a few pages back but I still don't get what is being said.

What exactly are we rotating here to adjust and change the voltage on the multimeter?

This is the only part of all of this I don't understand. Are we engaging the pedal (pressing the pedal) thus making the APS sensor rotate? Is that what we are talking about here?

Or are we rotating something else?

That I am totally not clear about. I have no idea what it is we are supposed to be rotating. I assumed the pedal itself was being pressed (that makes sense), but as I kept reading page by page I'm becoming less convinced that that is what we are talking about.

If someone can explain this simple point, everything is Kosher for the 2nd gen adjustment here and I will report back the results. I plan on taking the pedal out, backprobing it, hooking it up, making the adjustment, and then bolting it back in. Seems doable. Can make a decent writeup of it and will post here. Just don't know exactly what we are supposed to be doing here.

Thanks in advance from anyone with a 1st gen who can elaborate. I see there was a youtube video but it has since been taken down.
Clearly the 2nd Gen throttle IS NOT the same as the 1st Gen Throttle! The 1st Gen switch cover was adjustable.

You need to remove the throttle to take a look at the screws to see if it has any adjustment capability. Just by looking at the switch cover of a 1st Gen switch you could see the screw holes were elongated to allow movement.
 
#129 ·
Thanks guys for the replies. Like to see mods/repairs being kept alive and figuring out newer models.

So the journey continues. Three screws to get the pedal/TPS removed, one on the bottom of the pedal (remove a little cover to get to it), and two on the TPS holding the TPS to the car.

So here's where I'm at. Can't get the connector removed from the TPS, have no idea how this thing comes off. Don't want to break it, but it seems it doesn't just pull off. There must be some secret, not sure what it is. Squeezing, prying, don't know.

As for the screws, lets at least take a look at those. Interesting when comparing the screws on the 1st gen to the 2nd gen. Hard to see on my second gen but it looks like there is only a total of four screws in all, not 5 like on the 1st gen.
But I may be on to something here.

Lets compare the 2nd gen to the 1st gen. Thank you @Acura_Kal for linking that thread, I found a helpful photo in it.

First lets look at 2nd gen and what I'm dealing with here:
Image

As stated, only four screws, but I noticed something, the top left screw has a plastic encasement around it, and a Black sharpie Mark on it. This is similar to the 1st gen that has one screw with a black sharpie mark on it. And if you look closely at my 2nd gen picture above, could it be Is that a "T" marked in the plastic right below the screw? Or am I imagining things? But look at the 1st gen picture below anyway, there is also a black mark on one of the screws:
Image


If that black screw on the 1st gen is the adjustment screw (the one with the black mark on it) then I believe I have found the same equivalent screw on the 2nd gen.

I just don't know how I'm going to backprobe this thing because the wire to the connector is so short, so painfully short. I can't even see which wire is which.

But I guess we're getting somewhere.
 
#130 ·
This screw does look like it has an elongated hole for adjustment

Image


The screw with the black mark on the 1st Gen is a set screw. You cannot make any adjustment without removing that screw. It is a safety item - probably why they mark it (quality control).

I would venture it's the same on the 2nd Gen switch.
 
#132 ·
Nice, we're definitely getting somewhere.

Now if I can just figure out how to get the clip off so I can look at the wires, backprobe, and reconnect.
If there is not a clip that you can push to unlock the harness - is it possible that red flap needs to be brought down?

Image
 
#133 ·
Actually I have a thought. I happen to have an Autel tablet (Maxisys 906 BT), one of the fancy ones that ran me $1200. It can give me all kinds of live data on the car, live values, etc. Is it possible that I can get a voltage reading off of the tablet rather than physically backprobing the connector wires? I betcha I can. I know that doesn't help everyone in terms of a DIY writeup (though if they can backprobe it at least they know they are golden, given that we are seeing this is now likely possible on 2nd gen). But that may be easier than the connector route. I may try that first.

I'm gonna go see what the tablet can tell me and report back.
 
#134 ·
OK! I return with good news. This mod is 100% doable on a 2nd Gen Kia Forte (2014-2018), but it is a little bit more than a 10 minute job due to hard to reach bolt/screw locations. But the concept is exactly the same.

As stated earlier, one bolt, two nuts to get the pedal/APS to come loose so you can actually view the adjustment screws on the backside (side facing the center console). Once you have it loose you can turn the whole pedal/APS get a good view of the adjustable screws on the APS itself, as pictured above. As mentioned earlier, the screw in the top left (with a black sharpie mark on it) is indeed the set screw.

The screw on the top right, is the adjustment screw to allow for rotating the throttle body. I now see from the other thread what this "rotating" actually is. The plastic faceplate of the throttle body held on by these four screws actually rotates, or "slides" or pivots just a bit at the top to allow for adjustment. This can be seen below in the pic. After removing the two bottom screws and top-left Set Screw, I simply loosened the top right adjustment screw, and immediately the rotation was possible, the faceplate slides just a bit. As it slides, the voltage changes.

Image


Big thank you to @ForteGT2, you were totally correct about the adjustment screw. I would not have spotted that otherwise.

Now I did not end up backprobing the connector, or even removing the connector. I am lucky enough to have an Autel tablet and could get a reading from the tablet without removing the connector.

To reiterate, any readings must be done with the Key in the ignition, the key set to "ON" on the selector, with the engine not running. You do not need to have the engine running for any part of this adjustment/mod.

Here is the reading stock, before any adjustment was done:
Image


When rotating the faceplate on the APS with the loosened adjustment screw, this value changes.
I got it to 0.9V and then tightened down the adjustment screw, then added the set screw and the two bottom screws.
Image


The only downside of using the tablet was that it would only give me one decimal point of precision. I know everyone else who backprobed with a multimeter was able to have two decimal points. This is a significant disadvantage for me, because I now have no idea if I am at 0.99V at rest, 0.90V at rest, or somewhere in between. I may end up having to readjust.

But once all four screws are back in place, the pedal goes back in. The nuts up top are a little tricky but can be done with the right short extension and a small 1/4" socket (they are 12mm nuts). It's a squeeze but with a short extension you can get it right.

I am positive that this could be done without a diagnostics tablet, I can see the colored wires on the connector and know they could be backprobed with needles or a backprobe kit and any multimeter just like the 1st gen mod. I simply opted to avoid this due to having the equipment. If someone else makes an attempt where they backprobe, please post how to remove the connector! In the Kia Forte service info, it says the connector is removable. It just doesn't say how. I believe a flathead will be needed to pop a flap here or there, something like that, and then it likely just pulls off.

I will say though, everything is a tighter squeeze on the 2nd gen. Not having to backprobe, I was able to get this done in about an hour, but getting those backprobes set and fiddling with that may put you at a bit longer. The wire/harness going to the APS is very short. The concept is the same as the first gen mod, but the fiddling, trying to access the screws/bolts, made this a bit of a challenge on the 2nd gen. Overall just as simple in concept though, and just as doable.

Thanks again to those who assisted. I will be test driving it soon and reporting back on how it changed things.
 
#136 ·
Just finished a test drive. By the way, my 2018 forte is an Automatic. No CEL. No high-idle (that I can notice). I have been having an issue with high idle already, but only on cold start. This is a separate issue. But the car was already warmed up from driving a few hours ago, so idle did not seem higher than normal.

The whole reason I did this mod was because I've been having slightly rough 1-2 shift and somewhat laggy acceleration. While this did remove the dead spot for me, it didn't really fix the problem I was experiencing.

But the good news is this mod works for those who want to do it. Back to the drawing board for me to figure out what is actually causing my issues.
 
#137 ·
The consensus is to drive your car for 30min + then do the Throttle position sensor mod. The entire car mechanicals, sensors & computers have been warmed up & gone thru their operating cycles.

You may have it set too high & it's causing immediate high rev on the rpms at start ups.

Mine doesn't do that at all. Maybe cause it a 2010. Mine stays at under the line between 0 & 1rpms.
 
#138 ·
The consensus is to drive your car for 30min + then do the Throttle position sensor mod. The entire car mechanicals, sensors & computers have been warmed up & gone thru their operating cycles.

You may have it set too high & it's causing immediate high rev on the rpms at start ups.

Mine doesn't do that at all. Maybe cause it a 2010. Mine stays at under the line between 0 & 1rpms.
To be clear, the high idle was something happening before I ever touched the APS and did this mod at all.

It was happening before this mod, and is still happening. Probably should have held off on the mod, but I'm just trying to figure out what I can do to fix the issues with my car.

Once the car warms up, Idle seems normal, around 700 or something in that ballpark. But on cold start, it starts and 2000 and lowers after about a minute.

This is unchanged after the mod, and as stated was happening before, so it seems my problems are something else.

I may have to make a separate thread on it because I'm losing my mind. I've replaced so many things at this point and am making headway but I'm not sure if it's fuel related, or what. I believe it may be. Was having pretty sluggish acceleration and then replaced the fuel pump and MAP sensor, that helped things, but only somewhat. I keep making progress, but I still haven't gotten it where it needs to be.
 
#139 ·
Maybe the VCMA? Stuck, no longer working or burned out?

You can test it. Remove & use a 9V battery with wires & test to see if it rotates clockwise & counterclockwise.
DON'T FORCE IT WILL BREAK. I have a post/thread on VCMA & intake manifold butterfly DOORS being stuck/warped.

Dirty filthy throttle body with gunk?

Hope this helps?
 
#140 ·
Maybe the VCMA? Stuck, no longer working or burned out?

You can test it. Remove & use a 9V battery with wires & test to see if it rotates clockwise & counterclockwise.
DON'T FORCE IT WILL BREAK. I have a post/thread on VCMA & intake manifold butterfly DOORS being stuck/warped.

Dirty filthy throttle body with gunk?

Hope this helps?
Thank you for the input, I really appreciate it.

My car is relatively new (only 10,000 miles) and the throttle body is squeaky clean. All my problems started when I added royal purple max clean at double the recommended dosage.

So I believe it is fuel related. Replacing the fuel pump and map sensor helped. Better acceleration and better shifting. But my 1-2 is still sloppy sometimes and acceleration is still uneven and sluggish.

This APS mod actually helped, but with the uneven acceleration it can be weird. While out driving, one time I actually chirped the tires with very little acceleration (it removes the dead spot!). Other times it still basically bogs down, even after this mod.

It seems like the more throttle you give it, the more likely the shifts will be smooth. Replacing the fuel pump and MAP definitely helped and now all of my shifts are pretty much smooth except 1-2. Sometimes 2-3 is still a crappy, slow sloppy shift.

This mod helped though for now. If I can diagnose the real problem I will likely take the mod down a notch (to 0.8v) because this really gives a lot of takeoff sensitivity.

My thought was going to be new fuel injectors or oxygen sensors (possibly messed up by the fuel cleaners?) But I've thrown so many brand new parts and this car so far I don't know what to do next.

Another symptom I get sometimes is that I'll turn the key, nothing will happen for a few seconds and then cranking starts as normal. After the car is warmed up this never happens, only after its been sitting, sometimes. Also as the car warms up over an hour or two of driving, the acceleration and shifts get better. I was thinking it was a fuel pressure issue. Don't know. That's what has me thinking injectors but I really don't know. It's such a new car, it was working properly until I added cleaners and additives to the fuel tank. New pump/filter and MAP definitely helped.

Don't want to hijack this thread, I'll be making a separate one in a day or two, have to touchup a door scrape first lol.

For the thread though, for those interested in the APS mod on second gen though, it does work, but as people have stated 0.9v is a lot. I'll be watching it going forward and may tune it down just a bit.
 
#141 · (Edited)
@mobileterminaluser
Wait...Did you say don't force it or you will break it??

I did move the throttle body (like, the flap in the opening of the throttle body that allows air into the engine) with my hands a couple of times when I last had it open to look at it. I basically forced it open and then let it spring shut a few times.

Do you think it's possible I broke it doing so?

Maybe that's what needs replaced? The VCM motor.

Or is it the the throttle body that needs replaced?
 
#144 ·
@mobileterminaluser
Wait...Did you say don't force it or you will break it??

I did move the throttle body (like, the flap in the opening of the throttle body that allows air into the engine) with my hands a couple of times when I last had it open to look at it. I basically forced it open and then let it spring shut a few times.

Do you think it's possible I broke it doing so?

Maybe that's what needs replaced? The VCM motor.

Or is it the the throttle body that needs replaced?
Moving the butterfly in the throttle body is a big no-no with drive by wire. I've seen a number of throttle bodies get replaced due to that.
 
#142 ·
In case it wasn't clear by the other answer regarding how to remove the plug on the pedal,
the red piece pulls out and away from the plug. If the pedal is installed then the red piece will move horizontally. The grooves on it appear like they are there to allow better grip when removing it so that you can push it up but that doesn't appear to be their purpose.
Once the red clip is pulled out the plug can be disconnected normally.
 
#143 ·
Have you taken it to get OBD2 scanned & DTC'S/Codes found?

Check all you rubber hoses. They're age & conditions. The rubber hoses that you can remove at whim, check those for cracks, holes & deterioration & replace.

Yeah, make a seperate post/thread. So we can help & keep this awesome thread just TPS.